

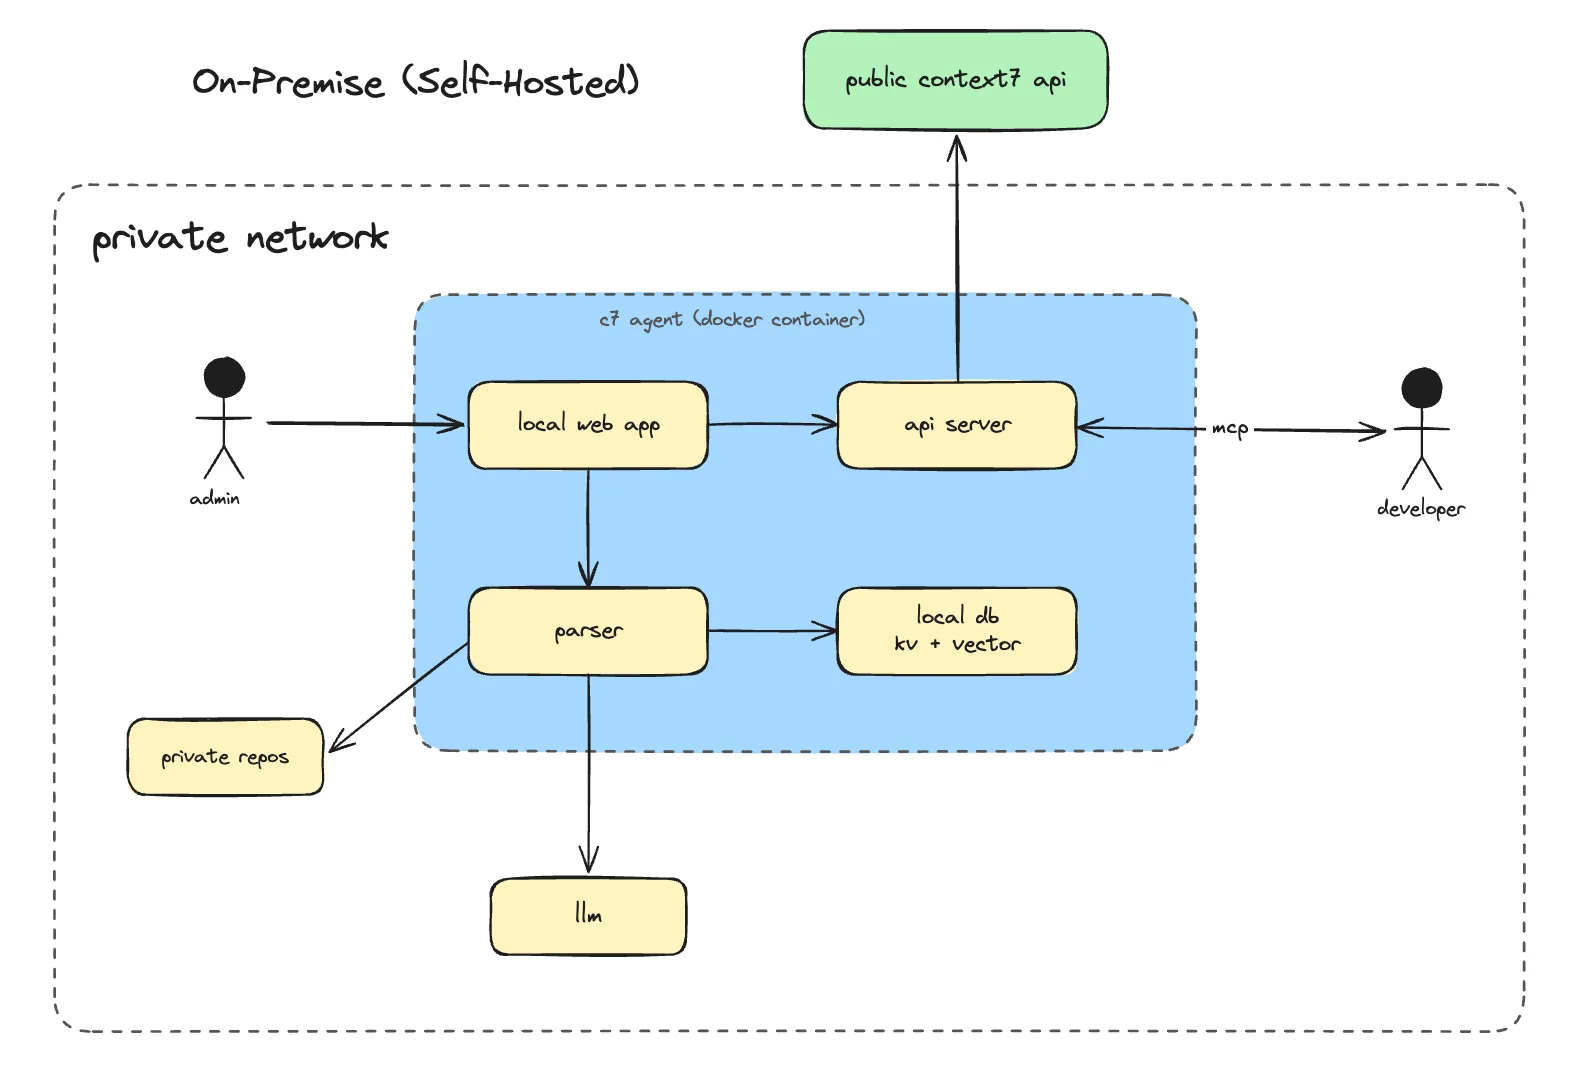
Context7 On-Premise keeps your repositories, generated documentation, application database, vector store, and MCP server in your infrastructure.
Two kinds of outside services receive data:
- Your AI providers receive the content needed for parsing, embedding, reranking, and source-code documentation.
- Context7 Cloud receives license checks, a daily usage report, and public library searches, but only with an online license. See Network and data flow.
What’s Included#
- Full Context7 parsing and indexing pipeline
- Local vector storage (no external vector DB required)
- Built-in MCP server. Works with any MCP-compatible AI client
- Web UI for managing indexed libraries and configuration
- REST API compatible with the public Context7 API
- Private GitHub and GitLab repository ingestion
Setup#
Request a trial
Go to context7.com/plans and click Learn More on the Enterprise plan, then click Request On-Premise Trial. Fill out the request form. No credit card required. You’ll receive a 30-day full-featured license key via email once approved.
Deploy
Follow the deployment guide for your platform:
Complete the setup wizard
Open http://localhost:3000 in your browser. On first launch, the setup wizard guides you through configuring:
- AI Provider - Choose OpenAI, Anthropic, Gemini, AWS Bedrock, or a custom OpenAI-compatible endpoint. Enter the provider credentials and model name.
- Embedding Provider - Use the same provider as your LLM, or configure a separate one for embeddings.
- Git Tokens - Add a GitHub and/or GitLab token for the platforms you use.
All configuration is stored locally in the embedded database and can be updated later in Workspace Settings.
Ingest your first repository
From the dashboard, click Add source, choose GitHub or GitLab, and enter the repository URL. Once ingestion completes, your private docs are ready to query.
You can also add libraries via the REST API with a personal API key (see Authentication):
Connecting Your AI Client#
The Context7 CLI is the recommended way to connect an AI coding agent. Install it once on the machine that runs your client:
For restricted or air-gapped environments, mirror the ctx7 package and its dependencies in your approved internal npm registry. Once installed, on-premise setup does not contact npm, GitHub, or Context7 Cloud. It uses bundled rule and skill content and contacts only your deployment to discover its MCP authentication setting.
Pass the root URL of your deployment (without /mcp or /api) and select the client:
Setup reads the deployment’s MCP authentication setting. When MCP authentication is disabled, no credential is written. When it is enabled, the dashboard’s Connect card presents two steps: sign in and click Create API key, then copy the command after the dashboard inserts the one-time-visible key. Select Configure manually to reveal the equivalent client-native configuration instead. If you run the base command without --api-key, the CLI requests the key with hidden input.
For non-interactive automation, provide the personal key through the environment:
You can use --api-key ctx7op-... instead, but command-line arguments may be retained in shell history. Setup writes the MCP client configuration, a Context7 rule, and a bundled context7-mcp skill. The bundled files mean the deployment does not need to expose Context7 Cloud’s skill APIs.
Custom --base-url setup uses the deployment’s Streamable HTTP endpoint. Hosted OAuth, local stdio transport, and CLI-query mode are not available for on-premise targets.
Manual configuration#
If your client is not supported by ctx7 setup, point it at <deployment-root>/mcp. When MCP authentication is enabled, send the personal key as a standard bearer token:
For other clients, see All Clients.
Configuration#
Environment Variables#
These are set in your docker-compose.yml or .env file before starting the container.
| Variable | Required | Description |
|---|---|---|
LICENSE_KEY | Yes | License key issued by Upstash |
PORT | No | HTTP port (default: 3000) |
DATA_DIR | No | Data directory inside the container (default: /data) |
DATABASE_URL | No | Postgres connection string. Without it, the embedded SQLite database in DATA_DIR is used. See Scaling |
PG_POOL_MAX | No | Postgres connection pool size per replica (default: 10) |
ENCRYPTION_KEY | No | 64 hex characters (openssl rand -hex 32) that encrypt stored secrets. Without it, a key is generated in $DATA_DIR/.encryption-key. The variable wins over the file |
VECTOR_STORE | No | auto (default), lancedb, pgvector, or milvus. See Vector Stores |
VECTOR_DATABASE_URL | No | Postgres connection string for pgvector, if it differs from DATABASE_URL |
PG_VECTOR_POOL_MAX | No | pgvector connection pool size per replica (default: 5) |
MILVUS_ADDRESS, MILVUS_TOKEN, MILVUS_USERNAME, MILVUS_PASSWORD, MILVUS_DATABASE | No | Milvus connection settings |
CONTEXT7_API_URL | No | Base URL for license checks, usage reports, and cloud library queries (default: https://context7.com/api) |
NODE_EXTRA_CA_CERTS | No | Path to a PEM bundle of extra CA certificates. The server trusts it for all outbound HTTPS, and git uses it too |
GIT_TLS_INSECURE | No | true or 1 turns off TLS verification for all outbound HTTPS and git. Use it only for testing |
AWS_REGION, AWS_DEFAULT_REGION, AWS_BEARER_TOKEN_BEDROCK, standard AWS credential variables | No | AWS Bedrock authentication. See AWS Bedrock |
LOG_MAX_SIZE_MB | No | Size of the log file before it rotates (default: 10). Logs are JSONL in $DATA_DIR/logs/context7.jsonl |
LOG_MAX_FILES | No | Number of rotated log files to keep (default: 3) |
NOTION_REQUESTS_PER_MINUTE | No | Notion API rate (default: 180). The only other accepted value is 600 |
MAX_FILES, PARSE_CONCURRENCY, PARSE_TIMEOUT, NOTION_MAX_PAGES, GOOGLE_DRIVE_MAX_FILES | No | Default values for the parsing settings. A value saved in the dashboard wins |
Set AI providers, models, provider keys, and git tokens in the setup wizard. You can change them later in Workspace Settings. There are no environment variables for git tokens (such as GITHUB_TOKEN or GITLAB_TOKEN) or for provider API keys.
AWS Bedrock is the exception. It can also authenticate with AWS_BEARER_TOKEN_BEDROCK, the standard AWS credential variables, a mounted shared profile, or a workload IAM role. See AWS Bedrock.
AI Provider Settings#
Configured under Workspace Settings › AI models in the web UI.
| Setting | Description |
|---|---|
| LLM Provider | openai, anthropic, gemini, bedrock, or custom |
| LLM API Key | API key for your chosen provider; optional for Bedrock with workload credentials |
| LLM Model | Model name or Bedrock model/inference-profile ID |
| AWS Region | Region used for Bedrock LLM and embedding requests |
| Base URL / Bedrock endpoint | Custom OpenAI-compatible endpoint, or an optional Bedrock Runtime endpoint |
Examples#
Embedding Settings#
By default, Context7 uses the same provider as your LLM for generating embeddings. Anthropic has no embedding models, so when the LLM provider is Anthropic, you must configure a separate embedding provider. With other providers, a separate embedding provider is optional.
| Setting | Description |
|---|---|
| Embedding Provider | openai, gemini, bedrock, or custom |
| Embedding API Key | Separate key; inherits the LLM key only when both use the same provider |
| Embedding Model | Embedding model name, such as text-embedding-3-small or amazon.titan-embed-text-v2:0 |
| Embedding base URL / Bedrock endpoint | Custom embedding endpoint, or an optional Bedrock Runtime endpoint |
See AWS Bedrock for IAM, model, region, and private-network configuration.
Decision Model#
Optionally, a decision model can classify pages, check for duplicate snippets, and rerank search results in place of the language model. It is faster and costs less for these yes/no decisions. See Decision Models to turn it on.
Parsing Settings#
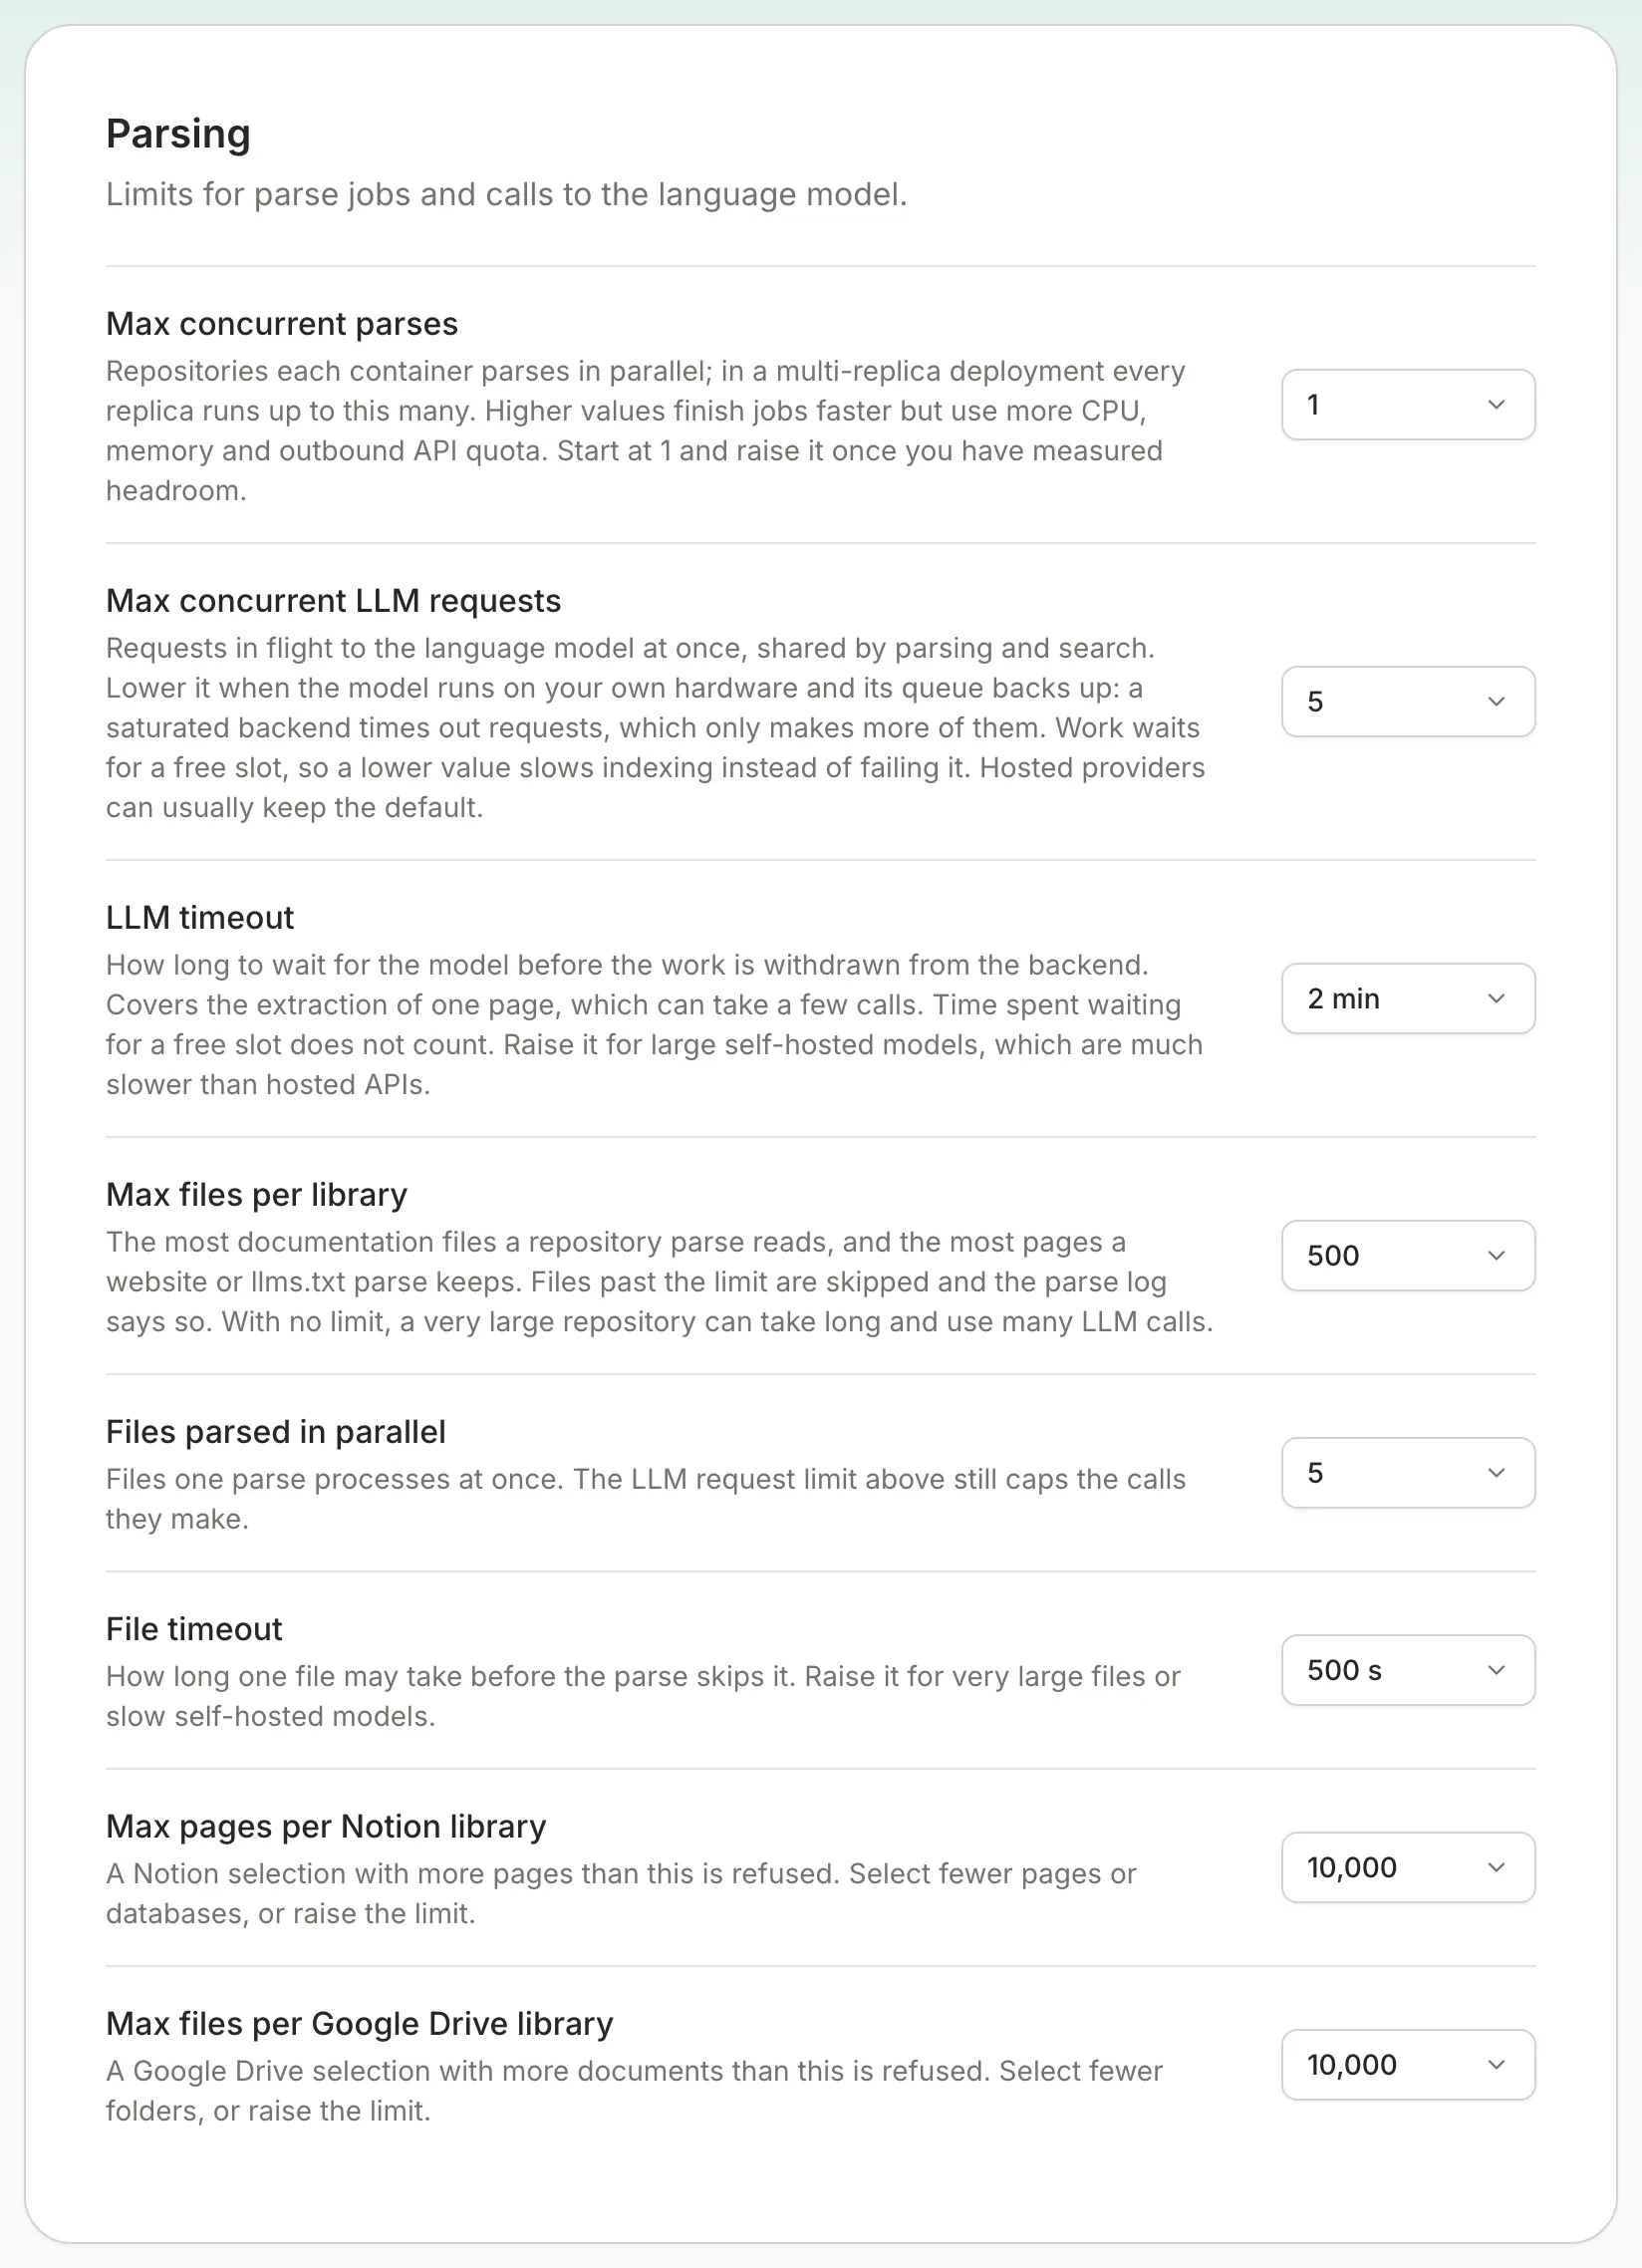
Change these in Workspace Settings › Parsing. Some settings also have an environment variable. The variable only sets the default; a value saved in the dashboard wins.
The three count limits also have a No limit option: files per library, Notion pages, and Google Drive files. Setting their environment variable to 0 does the same. Without a limit, a very large source can take a long time and make many LLM calls. File timeout and the concurrency settings always have a limit.
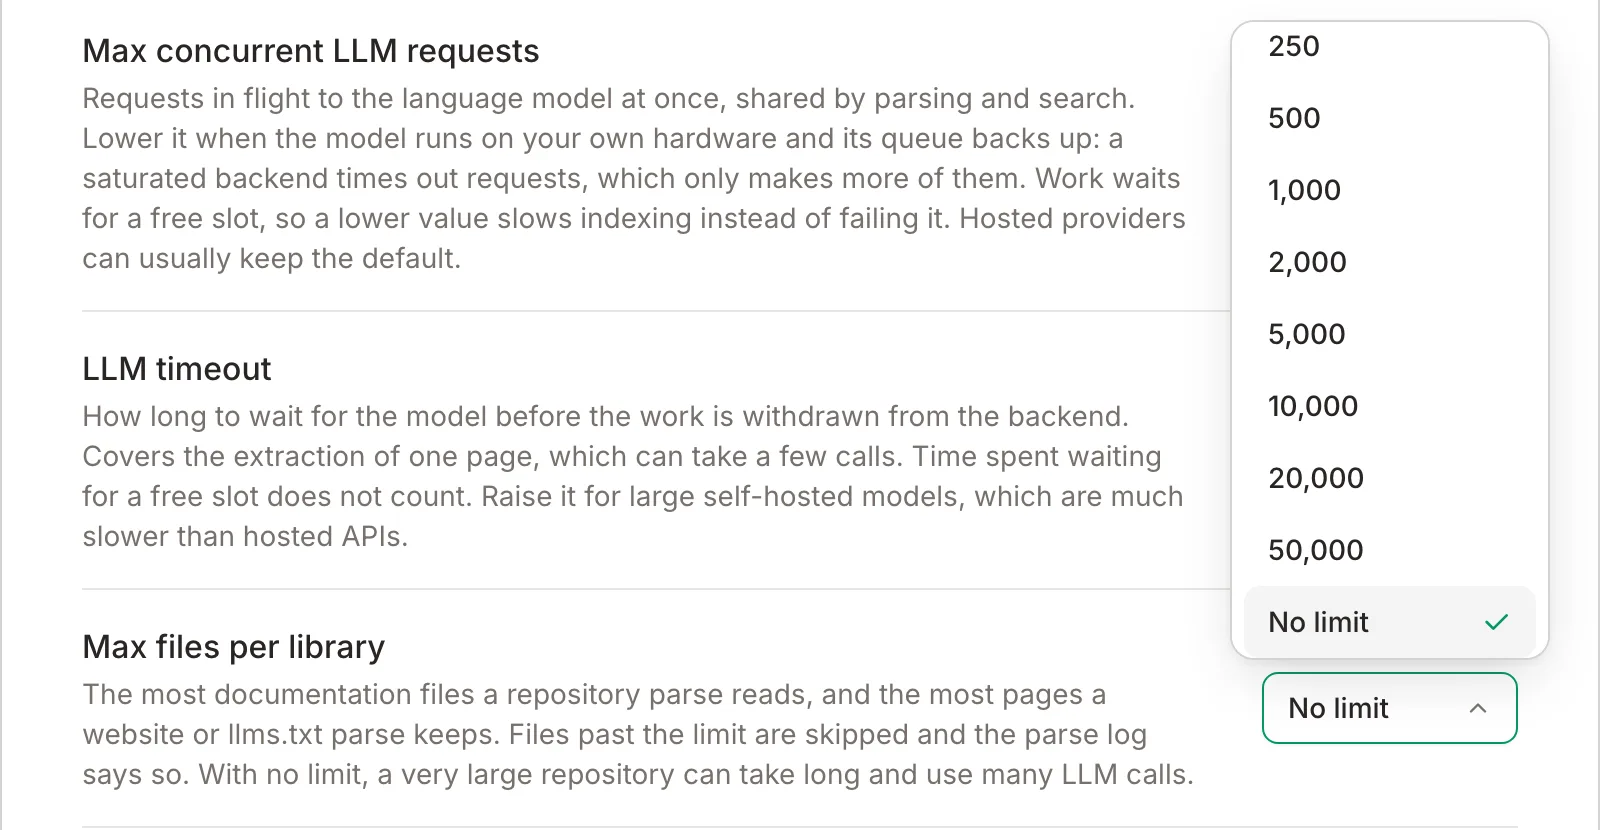
When a change takes effect:
- Settings with an environment variable: at the next parse, on every replica.
- Max concurrent parses, Max concurrent LLM requests, LLM timeout: at once on the replica that saves them. In a multi-replica deployment, other replicas use the new value after they restart.
| Setting | Default | Range | Env fallback | Description |
|---|---|---|---|---|
| Max concurrent parses | 1 | 1–10 | — | Parses each replica runs at the same time |
| Max concurrent LLM requests | 5 | 1–64 | — | Requests in flight to the language model, shared by parsing and search |
| LLM timeout | 120 s | 30–1800 s | — | How long to wait for one model call. Each part of a page takes up to four calls in a row (a page check, then code, API and info extraction), so it may run up to four times this value |
| Max files per library | 500 | 1–100000, or no limit | MAX_FILES | Documentation files a repository parse reads, or pages a website or llms.txt parse keeps. Extra files are skipped and logged |
| Files parsed in parallel | 5 | 1–64 | PARSE_CONCURRENCY | Files one parse processes at the same time |
| File timeout | 500 s | 30–3600 s | PARSE_TIMEOUT | How long one file may take. The parse skips a file that takes longer |
| Max pages per Notion library | 10000 | 1–100000, or no limit | NOTION_MAX_PAGES | A Notion selection with more pages is refused |
| Max files per Google Drive library | 10000 | 1–100000, or no limit | GOOGLE_DRIVE_MAX_FILES | A Google Drive selection with more Docs and Slides is refused |
Git Access Tokens#
Configured under Workspace Settings › GitHub, GitLab and Other Git in the web UI.
| Setting | Description |
|---|---|
| GitHub Token | GitHub Personal Access Token. Required for GitHub repositories |
| GitLab Token | GitLab token. Required for GitLab repositories |
| GitLab Server URL | Your self-hosted GitLab host, such as gitlab.your-company.com. In the GitLab row, select Self-managed, then enter it in Server URL |
You only need tokens for the platforms you use. If you only parse GitLab repos, you don’t need a GitHub token, and vice versa. Create tokens with repo scope (GitHub) or read_repository scope (GitLab) for private repository access.
The GitLab token is sent only to gitlab.com and the host in Server URL.
Access Control#
The server creates an admin account with the password admin at first boot. Change these credentials immediately after setup from Personal settings > Password > Change password.
Who can do what by default:
- Admins can do everything.
- Signed-in members and their API keys can parse and refresh libraries. To re-parse or replace an existing library, a member needs read access to it under the library access rules.
- Anonymous callers (no session and no API key) can do none of these.
Delete, cancel parse, and support bundle downloads are for admins only. Use the switches in Workspace Settings › Authorization to open some actions to anonymous callers. The MCP authentication switch in Workspace Settings › Authentication requires authentication for MCP and API search.
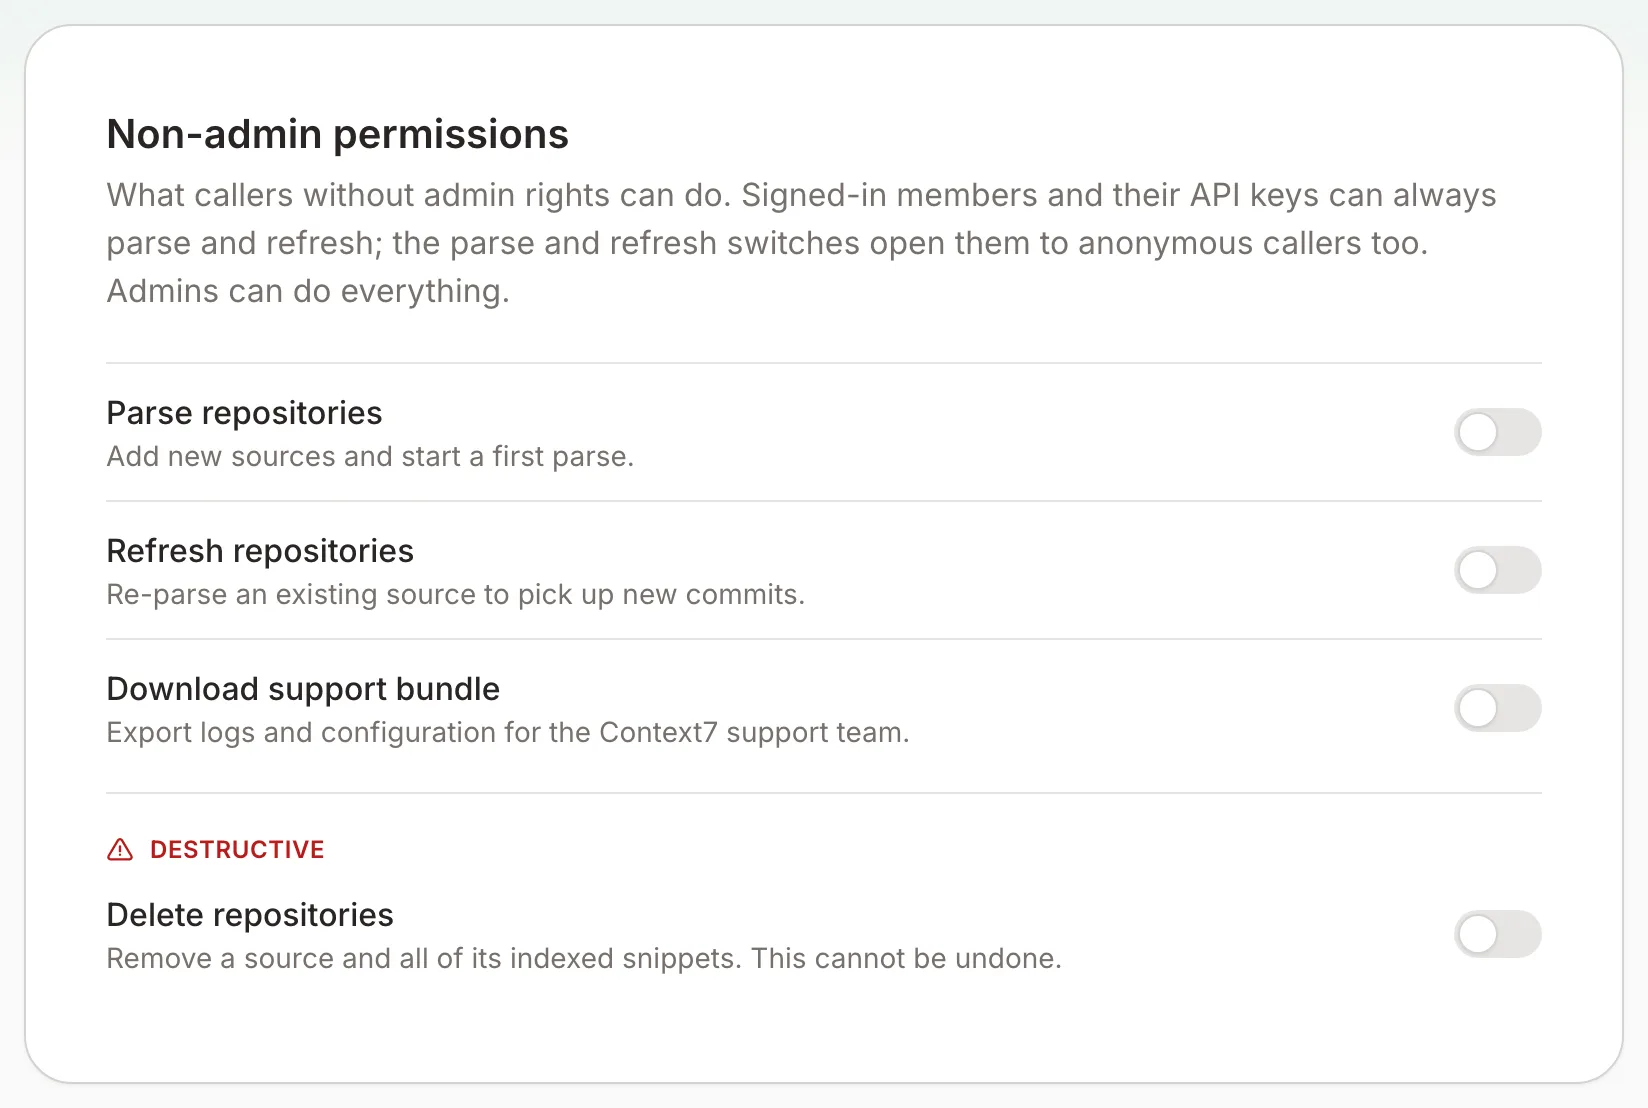
| Permission | Default | Description |
|---|---|---|
| Parse repositories | Off | Allow anonymous callers to trigger parsing |
| Refresh repositories | Off | Allow anonymous callers to refresh libraries. Notion and Google Drive libraries stay admin-only |
| Delete repositories | Off | Allow anonymous callers and members to delete libraries and cancel parses |
| Download support bundle | Off | Allow anonymous callers and members to download the support bundle |
| MCP authentication | On for a new install | Require a session or personal API key for /mcp, /api/v2, and the library, log, and queue read endpoints. See Authentication |
Earlier versions allowed anonymous parse and refresh by default. If you never saved these switches, they are off after an upgrade. Scripts that call these endpoints without an API key then get 403. Add a personal API key to the script, or turn the switch on.
A fresh install with no users, no existing admin, and no libraries starts with MCP authentication on. An install you upgrade keeps the setting you saved, so if you never turned it on it stays off.
When MCP authentication is enabled, each user creates personal keys from Personal settings > API keys. Clients send the key as Authorization: Bearer <key>.
When MCP authentication is off, a client that sends a valid personal API key is still treated as that user for library access, so it reads the restricted libraries the user can access. A client with no key, or an unknown key, is anonymous and reads only libraries that are open to everyone.
Recover admin access#
Lost the admin password, or locked out by a broken SSO setup? Run the reset-password script inside the container. It resets a local admin account and turns password sign-in back on. See Docker or Kubernetes.
Policies#
Policies let you control which public documentation from the Context7 cloud is accessible to your on-premise instance. They do not affect locally parsed on-premise content.
Open Workspace Settings › Content policies. Requires admin login and a valid LICENSE_KEY.
For details on source type toggles and library filters, see Customizing What Is Retrieved.
Network and Data Flow#
Besides your AI providers, git hosts, and connected sources, an instance with an online license contacts Context7 Cloud:
| Call | When | What is sent |
|---|---|---|
| License check | Every hour | The license key |
| Usage report | Once a day | License key, call counts per endpoint, number of active API keys, app version, team size. No query text |
| Public library search | On each library search | The search text and library name, with secrets masked first |
| Public library context | On a context query for a library that is not on this instance | The query, with secrets masked first, and the public library ID |
A context query for one of your local libraries is answered on the instance and sends nothing. No local library content or ID is sent. Per-user usage stays on the instance.
An offline license (ctx7off. prefix) is checked locally and makes none of these calls.
The server does not use HTTP_PROXY or HTTPS_PROXY for its own calls. For the full egress list, CONTEXT7_API_URL, and private CA setup, see Docker or Kubernetes.
Hosting#
- Serve Context7 at the root of a host name, such as
https://context7.internal.yourcompany.com. Hosting under a sub-path is not supported. - Behind a reverse proxy, Context7 uses
X-Forwarded-HostandX-Forwarded-Prototo build SSO redirect URLs. Configure the proxy to set these headers and overwrite any values the client sends.
Web UI#
Open your deployment URL in a browser to access the dashboard. From here you can:
- Add and remove libraries
- Trigger re-indexing
- Monitor parsing status and logs
- Update AI provider settings, git tokens, and permissions
- Configure policies for public cloud documentation access
- Test MCP connectivity
- Change admin credentials
Operations#
For updating, health checks, and other operational tasks, see the deployment guide for your platform:
Support#
For license issues, upgrade requests, or deployment questions, contact context7@upstash.com.